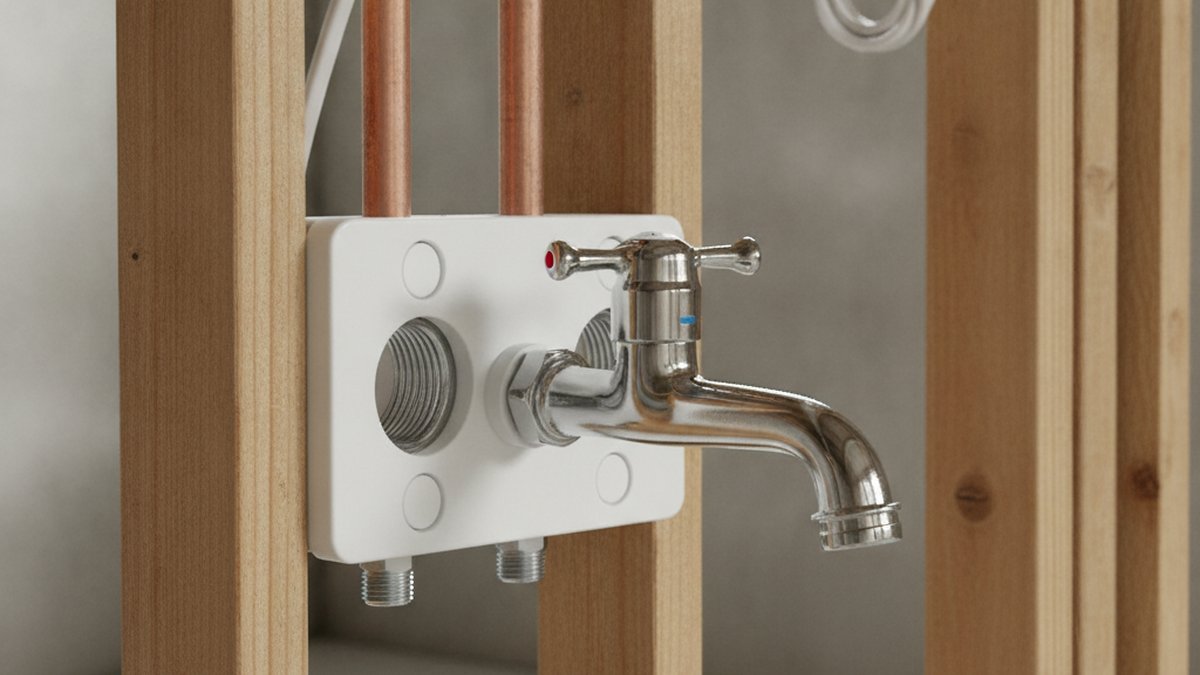
If you’ve ever stood in a laundry room holding a wall-mount faucet with two threaded inlets and nowhere to attach them, you’ve met the exact problem a laundry faucet mounting block solves. Unlike a kitchen faucet that drops through a hole in your countertop, a laundry or utility faucet often has to grab onto the wall itself — and drywall alone will never hold it. The mounting block is the unglamorous but critical piece that turns “two floppy pipes sticking out of the wall” into a rock-solid faucet you can lean on for the next 15 years.
Below, I’ll walk you through what these blocks actually do, the different types, how to choose the right one for your setup, whether you can skip it, and how to install it without leaks. This is written for people shopping right now — so I’ll be specific about sizes, materials, and what fails in real laundry rooms.
What does a laundry faucet mounting block actually do?
It does three jobs at once: it fixes the two water inlets at the correct center-to-center spacing (almost always 4 inches for laundry faucets), it distributes the twisting force of the faucet handles across the wall framing instead of into a single fragile pipe, and it gives you a flat, solid surface to seal the faucet against so it doesn’t rock or drip.
Here’s why that matters. A wall-mount laundry faucet has two arms that thread onto two supply pipes. Every time you turn a handle, you apply torque. If those pipes are only held by a solder joint or a compression fitting somewhere back in the wall, that torque travels straight to the weakest point — and copper work-hardens and cracks, while PEX simply flexes and eventually loosens the connection. The block clamps both inlets to a shared rigid body screwed into the studs, so the faucet feels planted and the plumbing behind the wall never moves.
The second quiet benefit is spacing accuracy. Laundry and utility faucets are built to a 4-inch inlet standard. If your rough-in pipes come out of the wall at 3.75 inches or 4.25 inches, the faucet arms won’t line up and you’ll either strip threads or leave a gap. A good mounting block has fixed, molded inlet ports at a true 4 inches on center, so the faucet always mates cleanly.
Do I really need a mounting block, or can I skip it?
Skip it only if your faucet mounts to a deck (a countertop or the rim of a laundry tub with pre-drilled holes). If your faucet mounts to the wall — which is by far the most common setup for utility sinks, mop basins, and old-school laundry rooms — you need something to anchor it, and a mounting block is the purpose-built answer.
People try to skip it in three ways, and here’s how each one goes:
- Bolting the faucet straight to drywall or a thin wall panel. This fails fast. Drywall has almost no pull-out strength, and within weeks the faucet sags, the arms rotate, and you get slow leaks at the inlets.
- Relying on the supply pipes alone. The faucet feels okay on day one, but the unsupported copper or brass nipples flex with every use. Over months, that fatigue cracks solder joints or loosens threaded unions inside the wall — the worst place to spring a leak.
- Screwing a random 2×4 in and hoping. This can work as a backer, but you still need correctly spaced, threaded inlet ports, and raw lumber gives you neither. That’s exactly the gap a molded mounting block fills.
So the honest answer: if it’s a deck-mount laundry faucet, no block needed. If it’s wall-mount, treat the block as mandatory hardware, not an accessory.
What are the different types of laundry faucet mounting blocks?
There are three common types: molded plastic backing blocks, brass mounting bars, and adjustable bracket kits. The right one depends on your wall type, your budget, and whether your rough-in spacing is already fixed.
| Type | Material | Best for | Typical price | Watch out for |
|---|---|---|---|---|
| Molded plastic backing block | ABS / polypropylene | New installs, DIY, finished laundry rooms | $8–$20 | Lower crush strength — don’t over-torque the faucet arms |
| Brass mounting bar | Solid or forged brass | Commercial/utility, mop sinks, heavy daily use | $25–$60 | Heavier; needs solid stud backing |
| Adjustable bracket kit | Steel + plastic ports | Retrofits where rough-in spacing is off | $15–$35 | More parts to seal; verify it locks at true 4″ |
For most homeowners installing a standard wall-mount laundry faucet, the molded plastic block is the sweet spot — cheap, corrosion-proof, and dead simple. For a busy commercial laundry, a garage utility sink that gets slammed, or a mop basin in a rental property, spend the extra money on a brass bar; it won’t creep or crack under years of hard handle-cranking. Choose an adjustable bracket kit only when your existing pipes come out of the wall at the wrong spacing and you can’t move them.
What size and spacing do I need — is it always 4 inches?
For laundry and utility faucets, yes — 4-inch center-to-center inlet spacing is the near-universal standard, and it accepts standard 1/2-inch supply connections. Before you buy, measure the distance between the centers of your two rough-in pipes and confirm it’s 4 inches; that single measurement decides whether a standard block fits or whether you need an adjustable one.
A few specifics worth knowing before you order:
- Inlet thread size: Most laundry faucet inlets are 1/2-inch IPS (iron pipe straight) or accept 1/2-inch FIP connections. Match this to your supply lines.
- Stud spacing: Wall studs sit 16 inches on center in most homes. A good block spans at least one stud bay so you can screw into framing on one or both sides.
- Depth: The block should sit flush with, or just proud of, your finished wall surface so the faucet body seals against the wall, not against open drywall.
If your supply lines are the wrong length to reach the block cleanly, that’s a supply-line problem, not a block problem — and it’s easily fixed with a braided connector of the right length. I’ve covered how to size those in our guide on which faucet supply line length you actually need, which is worth a read if your shutoff valves sit far from the faucet.
How do I install a laundry faucet mounting block without leaks?
Shut off the water, secure the block to solid framing, thread the faucet arms into the block’s inlet ports with fresh thread sealant, then connect your supply lines and pressure-test before you close anything up. The whole job takes about 30–45 minutes if your rough-in plumbing is already in place.
Here’s the sequence I’d follow:
- Turn off the water at the laundry shutoffs (or the main if there are none) and open the faucet to relieve pressure.
- Position the block so its inlet ports line up with your rough-in pipes and it spans at least one stud. Mark and screw it into the framing — not just drywall.
- Connect the inlets: thread your supply pipes or braided lines into the block’s ports using PTFE tape or pipe dope on tapered threads. Do not over-tighten plastic ports — snug plus a quarter turn is plenty.
- Mount the faucet to the block, checking that it sits level and the handles clear the backsplash.
- Pressure-test: slowly turn the water back on and watch every joint for 60 seconds before you run the faucet. Feel behind the block for dampness.
Two mistakes cause almost every callback here. The first is over-torquing threaded connections and cracking a plastic port — go by feel, not muscle. The second is skipping the leak test and drywalling over a weeping joint. If you don’t own the basic wrenches for this, our roundup of the faucet installation tools worth having on hand covers what actually earns a spot in your kit versus what’s marketing.
What goes wrong with laundry faucet mounting blocks over time?
The most common failures are cracked plastic ports from over-tightening, mineral buildup narrowing the inlets in hard-water areas, and slow drips at the inlet threads when the sealant wasn’t done right. All three are preventable, and none require replacing the whole faucet.
Cracked ports come from installers treating plastic like brass — plastic threads want to be snug, not gorilla-tight. If you’re in a hard-water region, scale can build up inside the inlets and at the faucet’s internal passages over the years; the same crust that clogs an aerator can restrict flow here too, and the fix is similar to what we describe in our walkthrough on removing hard-water buildup from a faucet. And if a handle starts to drip or gets stiff, that’s usually the faucet’s cartridge or washer, not the block — understanding what a faucet cartridge does tells you whether you’re looking at a cheap $12 fix or a full swap.
Plastic vs. brass mounting block — which should you buy?
Buy plastic for a normal home laundry room and brass for anything commercial, high-traffic, or where the faucet takes daily abuse. Plastic is corrosion-proof, cheap, and perfectly strong for typical residential use; brass costs more but shrugs off years of hard cranking and heavy mop-sink duty without creeping or cracking.
Think about how the faucet gets used, not just what it costs. A block behind a faucet you fill a bucket from twice a week can absolutely be plastic. A block behind the faucet in a salon, a garage that doubles as a workshop, or a rental where tenants will yank on the handles is worth the brass upgrade — the difference is $30, and it’s the cheapest insurance in the whole install. Whichever you choose, buy from a brand that publishes its material specs and backs the part with a warranty rather than an unbranded block with no documentation.
Where does Vevetta fit in — and what should you look for in a quality block?
Look for correct 4-inch spacing, a clearly stated material (virgin ABS or solid brass, not “recycled composite”), reinforced inlet ports, and a manufacturer warranty. Vevetta designs its laundry and utility faucet hardware to meet standard 4-inch rough-in spacing and 1/2-inch supply connections, so the block, faucet, and your existing plumbing all speak the same language out of the box.
A cheap no-name block can technically hold a faucet, but the failure points are predictable: loose tolerances that leave the inlets slightly off 4 inches, thin port walls that crack, and no warranty when something goes wrong six months in. Spending a few dollars more on a properly specified block from a brand that stands behind it is the difference between a one-time job and a repeat trip into the wall.
FAQ
Is a laundry faucet mounting block the same as a mounting plate?
Mostly, yes — the terms get used interchangeably. “Block” usually implies a thicker, three-dimensional body with molded inlet ports, while “plate” or “bracket” can mean a flatter backing piece. Functionally they do the same job: anchor a wall-mount faucet to solid framing at the correct spacing.
Can I use a laundry faucet mounting block for a utility or mop sink?
Yes. Utility sinks, mop basins, and laundry tubs all commonly use wall-mount faucets with 4-inch inlet spacing, so the same mounting block works. For mop sinks and commercial spaces that see heavy daily use, choose a brass block over plastic for the extra durability.
What size supply connections does a laundry faucet mounting block use?
Almost always 1/2-inch, matching standard residential supply lines, with inlets spaced 4 inches on center. Measure your rough-in pipe spacing and confirm your supply line size before ordering so everything threads together without adapters.
Do I need to mount the block into studs, or is drywall enough?
You must anchor into studs or solid blocking — drywall alone will not hold a faucet under handle torque. Position the block so at least one mounting screw catches framing; if your studs don’t line up, add a horizontal 2×4 blocking behind the drywall to screw into.
How do I stop leaks at the mounting block inlets?
Use fresh PTFE thread tape or pipe dope on tapered threads, tighten to snug plus about a quarter turn (never gorilla-tight on plastic ports), and pressure-test every joint for a full minute before closing up the wall. Most inlet leaks trace back to skipped sealant or an over-torqued, cracked port.
Can I replace just the mounting block without replacing the faucet?
Yes. The block and the faucet are separate parts, so if the block cracks or the ports strip, you can shut off the water, unthread the faucet, swap in a new correctly-spaced block, and reinstall the same faucet. This is a common and inexpensive repair.
Author note: This guide was written by the Vevetta fixtures team, drawing on hands-on installation of wall-mount laundry and utility faucets across residential and light-commercial settings. We test our mounting hardware against standard 4-inch rough-in spacing and 1/2-inch supply connections, and back our laundry faucet components with a manufacturer warranty. For product-specific torque specs and warranty terms, always check the documentation that ships with your Vevetta faucet.