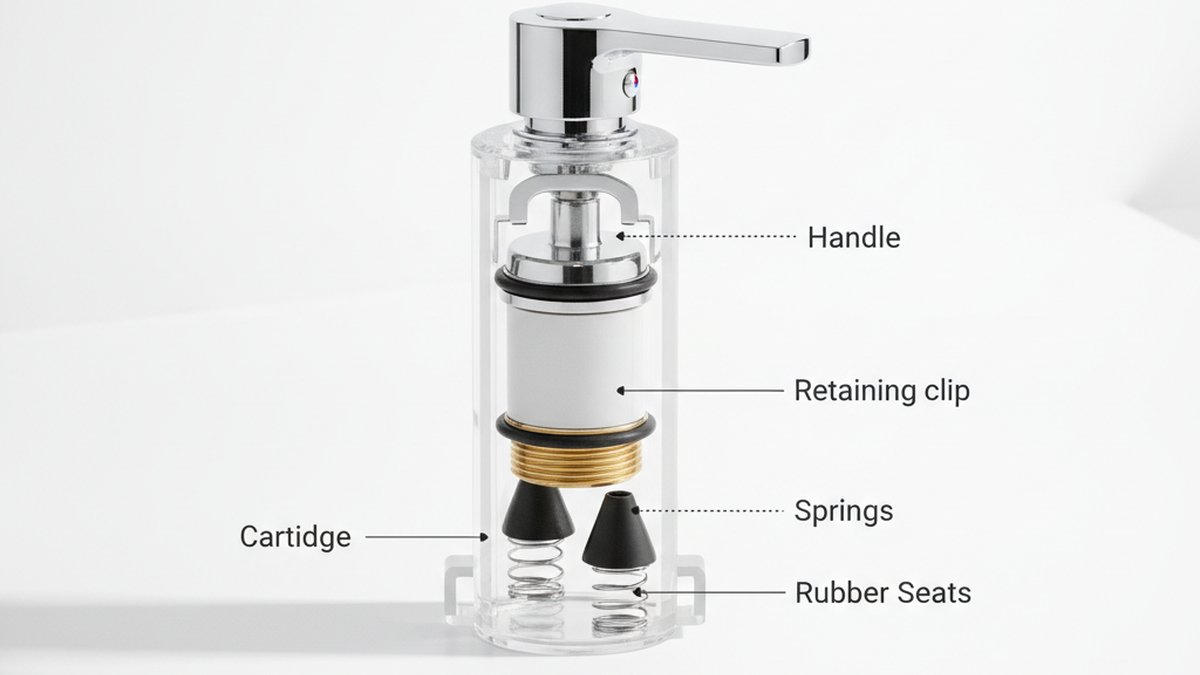
Learning how to fix a leaking shower faucet valve is easier than most people expect — in the overwhelming majority of cases the leak isn’t the pipe, the wall, or the whole faucet. It’s one small worn part inside the valve body: a cracked cartridge, a flattened rubber seat, or a hardened O-ring. Swap that part and the drip stops. You do not need to open the wall, and you almost never need to replace the entire shower faucet. Below, we’ll walk through exactly how to diagnose which part failed, how to get it out, and how to put everything back so it seals for years.
This is a repair guide written the way a plumber would actually talk you through it standing in your bathroom — no fluff, real part names, real torque, real troubleshooting for when the leak won’t quit.
What actually causes a shower faucet valve to leak?
Ninety percent of the time the culprit is one of three worn parts: the cartridge, the rubber seats and springs, or the O-rings. Water pressure runs across these parts every time you shower, and rubber hardens while brass wears — so after 5–10 years they stop sealing and you get a drip from the showerhead or a leak around the handle.
Knowing where the water is coming from tells you which part to replace. Use this quick map:
| Where you see the leak | Most likely cause | Typical fix & cost |
|---|---|---|
| Drip from the showerhead when off | Worn cartridge or rubber seats/springs | Replace cartridge or seats — $8–$40 |
| Water seeping around the handle | Cracked O-rings or loose packing nut | Replace O-rings / tighten — $5–$15 |
| Drip from tub spout, shower off | Worn cartridge (diverter or main) | Replace cartridge — $15–$40 |
| Leak only at certain temperatures | Failed cartridge or seat on hot/cold side | Replace cartridge — $15–$40 |
| Constant trickle even at “off” | Cartridge won’t fully close / mineral buildup | Clean or replace cartridge — $15–$40 |
Notice that a dripping showerhead and a dripping tub spout usually point to the same valve part — the cartridge — not to the showerhead or spout itself. If your issue is specifically at the spout, our guide on why a bathtub faucet is dripping breaks down the diverter-versus-cartridge question in more detail.
What tools and parts do I need before I start?
You need very little: a screwdriver, an Allen (hex) key, a pair of pliers, and the correct replacement cartridge or seat kit for your specific brand. The single most important step is identifying your valve before you buy anything, because a Moen part will not fit a Delta and a Kohler won’t fit a Pfister.
- Phillips and/or flat-head screwdriver — for the handle set screw and trim plate.
- Allen/hex key set — most single-handle showers use a tiny set screw under the handle.
- Adjustable wrench or channel-lock pliers — for the bonnet nut or packing nut.
- Cartridge puller (brand-specific, ~$10–$20) — for stuck Moen 1225 or Delta cartridges.
- Replacement part — cartridge, or a seat-and-spring kit, or an O-ring kit that matches your model.
- Plumber’s grease (silicone) — never petroleum; petroleum destroys rubber seals.
- White vinegar & an old toothbrush — for dissolving hard-water crust off the valve body.
To find your part, look for a model number on the trim plate, the handle, or the original paperwork. If you’re empty-handed, snap a photo of the removed cartridge and take it to a hardware store — matching by shape is reliable. Vevetta cartridges and seat kits list the exact valve bodies they fit, so you can match by brand and series instead of guessing.
How do you fix a leaking shower faucet valve step by step?
Shut off the water, take the handle and trim off, pull the worn cartridge or seats out, drop the new part in the same orientation, and reassemble — that’s the whole job. Here’s the detailed sequence so nothing goes wrong.
- Turn off the water. Use the shut-off stops behind the access panel if you have them; otherwise shut off the house main. Then open the shower handle to release residual pressure and let the line drain.
- Cover the drain. Lay a rag or drain cover over the tub/shower drain so a dropped set screw or clip can’t disappear down it. This one habit saves entire repairs.
- Remove the handle. Pop off the decorative cap if there is one, loosen the set screw with your hex key, and pull the handle straight off. Don’t pry sideways — you’ll bend it.
- Remove the trim/escutcheon. Unscrew or unclip the trim plate and the sleeve to expose the valve body. Take a phone photo now so you remember the orientation.
- Release the retaining clip or bonnet nut. Many cartridges are held by a small horseshoe-shaped brass clip you pull straight up with pliers; others use a threaded bonnet nut you unscrew. Don’t lose the clip.
- Pull the cartridge (or seats/springs). Grip the cartridge stem with pliers and pull straight out, wiggling gently. If it’s fused with mineral buildup, use the brand cartridge puller. For Delta-style valves, lift out the seats and springs from inside the valve body with a pick.
- Inspect and clean. Look at the old part — cracked rubber, scored brass, and white crust confirm the diagnosis. Scrub the valve body bore with vinegar and a toothbrush so the new part seats cleanly.
- Grease and install the new part. Apply a thin film of silicone plumber’s grease to the O-rings, then push the new cartridge in with the SAME orientation (there’s usually a flat, notch, or “H/C” mark). For seat kits, drop the spring in first, then the rubber seat, cupped side toward the valve.
- Reinstall the clip, trim, and handle. Reverse your steps. The retaining clip must fully seat or pressure will blow the cartridge out.
- Turn water back on slowly and test. Restore water gradually, run hot and cold, and watch for drips at the spout, showerhead, and handle for a few minutes.
If you’re wrestling with a stuck rubber washer on an older two-handle valve, the same principles in our walkthrough on how to remove an old tap washer without wrecking the faucet apply directly to shower stems.
How do I know if it’s the cartridge or just the rubber seats?
If your shower has a single handle, it’s almost certainly a cartridge; if it has separate hot and cold handles (or a Delta single-handle “ball” style), it’s usually the rubber seats and springs. Single-handle Moen and Kohler valves seal with one cartridge, so a drip there means the cartridge. Delta valves seal with two small rubber seats pushed by springs — cheap to replace and the most common Delta drip fix. When in doubt, our explainer on the purpose of a faucet cartridge shows exactly what the part does and why it fails.
How do I match the right replacement cartridge to my shower brand?
Match by brand and series number, not by looks alone — several cartridges look nearly identical but differ by a few millimeters and won’t seal. The reliable path is finding the model number on the trim, then buying that brand’s specified cartridge. Here are the most common single-handle shower valves and their go-to parts:
| Brand / valve | Common part | Notes |
|---|---|---|
| Moen (Posi-Temp) | 1222 or 1225 cartridge | 1222 is newer; use the Moen puller — they seize with hard water |
| Delta (Monitor 1300/1400) | RP19804 seats & springs, or RP46074 cartridge | Try seats/springs first — cheapest fix |
| Kohler (Rite-Temp) | GP76851 / GP1017640 cartridge | Note the model on the trim — several revisions exist |
| Pfister (0X8 / TX8) | 974-042 / 974-291 cartridge | Check whether you have the 0X8 or the newer valve |
| Price/older two-handle | Stem & washer or seat kit | Match stem length and thread count |
If you can’t read any markings, pull the old cartridge and match it physically — length, spline count on the stem, and O-ring positions all have to line up. Buying the wrong cartridge is the number-one reason a “fixed” shower still drips a week later.
Why is my shower faucet still leaking after I replaced the cartridge?
If it still drips after a new cartridge, the usual reasons are a mismatched part, a nicked O-ring, mineral debris on the valve seat, or the retaining clip not fully seated. Work through these in order before you blame the new part:
- Wrong or “close enough” part. Even a 2 mm difference or wrong spline count stops it sealing. Verify the exact model.
- Torn O-ring during install. Dragging a dry O-ring over a sharp edge can slice it. That’s why you grease it first — re-inspect and replace if needed.
- Debris or scale on the seat. A speck of grit or a ridge of hard-water scale keeps the cartridge from closing flush. Re-clean the bore with vinegar.
- Clip or bonnet not fully seated. If the cartridge sits even slightly proud, it won’t compress the seals. Push it fully home and confirm the clip drops all the way in.
- Cracked valve body. Rare, but a corroded or cracked brass valve body leaks no matter what cartridge you fit — this is the one case that usually needs a plumber.
Also flush the line before final assembly: with the cartridge out, briefly crack the water on to blast debris out of the valve body. Sediment shaken loose by the repair is a sneaky cause of a “new leak” right after you finish.
Can hard water make a shower valve leak faster?
Yes — hard water is the biggest enemy of shower valves. Dissolved calcium and magnesium deposit as scale on the cartridge, seats, and valve bore, which both wears the rubber and holds the valve slightly open so it drips. If you’re on hard water, expect to service the valve more often and consider descaling the whole fixture on a schedule. The same crust that ruins valves also clogs your showerhead, and the technique carries over from our guide on cleaning faucet-head buildup.
When should I stop and just call a plumber?
Call a plumber if you find a cracked valve body, if the valve is soldered copper with no shut-offs and you’re not comfortable sweating a joint, or if water is leaking inside the wall rather than at the trim. Those situations involve either specialized skills or opening drywall, and the downside of getting it wrong — water in the wall cavity — is expensive.
Everything covered above — cartridge swaps, seat-and-spring kits, O-rings, handle leaks — is genuinely a DIY-level repair for most homeowners with basic tools. But there’s no shame in the wall-leak call; a hidden leak behind tile can cause mold and rot long before you see a stain. If you notice discoloration on the ceiling below the shower or a musty smell, that’s your cue to bring in a pro.
How do I keep a shower valve from leaking again?
Grease the seals on install, descale periodically if you have hard water, and don’t overtighten the handle — cranking a faucet “off” harder than needed crushes the seat and shortens its life. A valve that’s serviced correctly and turned off with a light hand can easily go a decade before it needs attention again.
- Use only silicone plumber’s grease on seals — petroleum jelly swells and destroys rubber.
- Turn the handle off gently; “hand tight,” not “gorilla tight.”
- Descale the valve trim every 6–12 months on hard water.
- Keep a spare cartridge or seat kit on hand — they’re cheap and save a mid-shower emergency.
- Install shut-off stops during any future remodel so the next repair takes 30 minutes, not two hours.
FAQ
How much does it cost to fix a leaking shower faucet valve yourself?
DIY, it’s typically $8–$40 for the part plus tools you likely already own — a seats-and-springs kit runs under $10, and most cartridges are $15–$40. A cartridge puller, if your brand needs one, adds $10–$20. Compare that to $150–$350 for a plumber, and the DIY savings are obvious for a repair most people can finish in under an hour.
Can I fix a shower valve leak without turning off the main water?
Only if you have dedicated shut-off stops behind an access panel for that shower — then you can isolate just the shower. If there are no stops, you must shut off the house main; opening a pressurized valve will flood the bathroom. Never try to “work fast” around live pressure inside a shower valve.
How long does a shower faucet cartridge last?
A quality brass or ceramic-disc cartridge lasts roughly 5–10 years, but hard water, grit, and heavy use can cut that to 2–3 years. Ceramic-disc cartridges generally outlast rubber-seat designs. If you’ve replaced one and it fails quickly, suspect hard water or debris in the line rather than a defective part.
Why does my shower drip only hours after I turn it off?
A slow drip that appears minutes to hours after shutoff is classic worn-seat or worn-cartridge behavior — the seal no longer fully closes, so the residual water in the riser weeps out gradually. It’s not “trapped water draining”; it’s a failing seal, and replacing the cartridge or seats fixes it for good.
Is fixing a shower valve the same as fixing an outdoor or tub faucet?
The core idea is identical — a worn washer, seat, or cartridge inside a valve stops sealing and you replace it. The trim and access differ. For an exterior spigot, the steps in our guide on how to fix a leaking outdoor faucet handle mirror the shower process almost exactly, just with a hose bibb instead of a wall valve.
Do I need to replace the whole shower faucet if the valve leaks?
Almost never. The valve body is usually fine — it’s the replaceable internal parts (cartridge, seats, O-rings) that wear out, and those are designed to be swapped. You’d only replace the whole faucet if the brass valve body is cracked or corroded through, which is rare on residential fixtures under 20 years old.
About the author: This guide was written by the Vevetta fixtures team, drawing on hands-on repair experience across Moen, Delta, Kohler, and Pfister shower valves. About Vevetta: Vevetta designs and sells faucets, shower systems, and repair parts at vevetta.net, and our cartridges and seat kits are pressure-tested and listed by the exact valve bodies they fit so you match the right part the first time. All Vevetta valve components are tested to standard residential water-pressure and cycle ratings and backed by our replacement-parts warranty — always confirm compatibility with your specific model and follow local plumbing codes when making repairs.