If you’ve searched “bar faucet parts,” you’re usually in one of two situations: you’re buying a new bar or prep faucet and want to understand what’s inside before you spend the money, or something on your existing bar faucet is leaking, wobbling, or barely trickling and you need the right replacement piece. Either way, the good news is that a bar faucet is a simple machine with maybe eight or nine parts that matter — and once you know what each one does, buying and fixing them gets a lot less intimidating.
A bar faucet (sometimes called a prep faucet) is essentially a compact kitchen faucet built for a smaller secondary sink — a wet bar, an island prep station, an outdoor kitchen, or a butler’s pantry. Because it’s smaller and gets lighter use than a main kitchen faucet, the parts are often slightly downsized, but they follow the exact same logic. Let’s walk through every part, what breaks, and how to buy the right replacement.
What are the main parts of a bar faucet, from top to bottom?
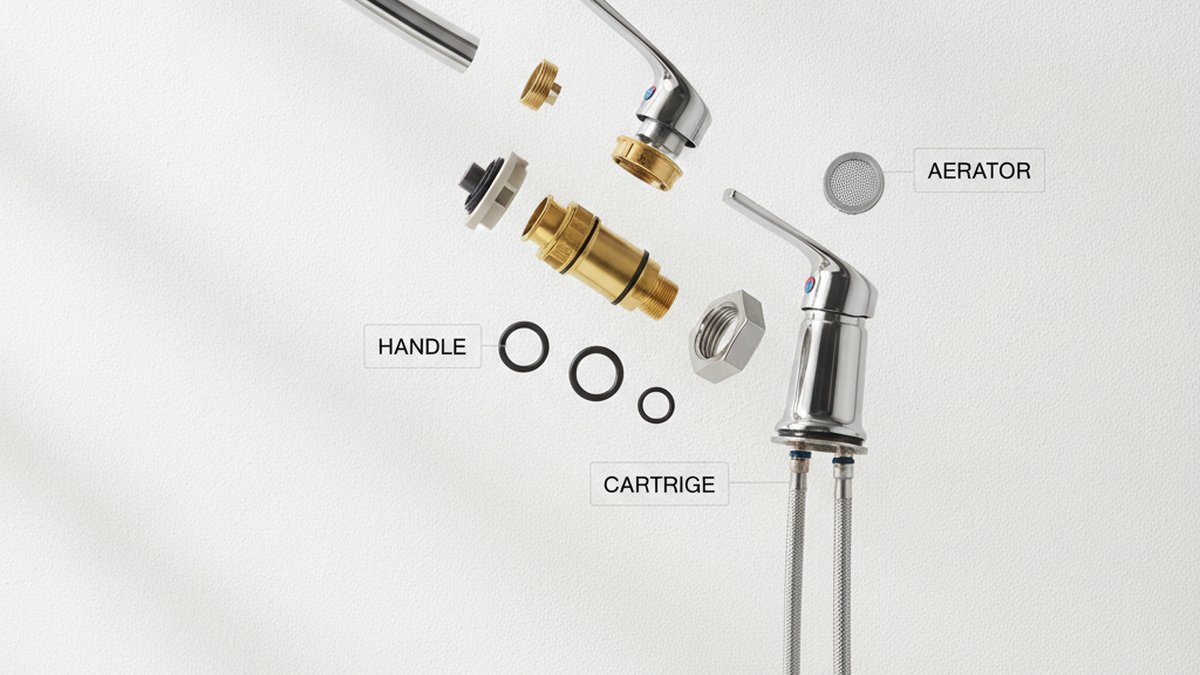
The main parts of a bar faucet are the spout, handle, cartridge, aerator, escutcheon or base plate, O-rings and seals, mounting hardware, and supply lines — plus a spray head and hose if it’s a pull-down model. Here’s what each one actually does.
- Spout: the arched body the water flows out of. On bar faucets it’s usually shorter and lower than a kitchen faucet, so it fits under wall cabinets and doesn’t splash a shallow sink.
- Handle: the lever (or two handles, on a widespread model) that controls hot/cold and flow. It attaches to the cartridge stem, usually with a small set screw.
- Cartridge (or valve): the heart of the faucet. This sealed unit mixes hot and cold and shuts the water off. When a faucet drips or gets hard to turn, this is the part that’s failed 80% of the time.
- Aerator: the small screw-in screen at the tip of the spout. It mixes air into the stream to prevent splashing and control flow rate (measured in GPM — gallons per minute).
- O-rings and seals: rubber rings that keep water from escaping around the spout base and cartridge. Cheap to replace, and the usual cause of a leak at the base.
- Escutcheon / base plate / mounting deck: the trim piece that sits on the countertop and hides the mounting hole(s).
- Mounting hardware: the nut, washer, and bracket under the counter that clamp the faucet down tight.
- Supply lines: the flexible braided hoses that connect the faucet tails to your shutoff valves.
- Spray head and hose: on pull-down/pull-out bar faucets, the retractable nozzle and the weighted hose that lets it snap back into place.
Understanding these bar faucet parts is what lets you diagnose a problem in about thirty seconds instead of replacing the whole fixture. A dripping spout means the cartridge; weak flow means the aerator; a puddle at the base means O-rings; a loose faucet that rocks means the mounting nut backed off.
Why is my bar faucet dripping, and which part do I replace?
A dripping bar faucet is almost always a worn cartridge or a damaged O-ring/seal inside the valve. Replace the cartridge first — it’s the part that physically shuts the water off, and when the internal seals wear out or grit scratches them, water sneaks past even when the handle is fully closed.
Here’s the quick diagnostic:
- Drips from the spout tip when off? The cartridge (or its seats and springs, on some designs) has failed. Swap it.
- Water seeping around the base of the spout where it meets the deck? That’s the spout O-rings. They’re a cheap fix — usually a $5 kit.
- Leak under the sink? Check the supply-line connections and the cartridge nut before blaming the faucet body itself.
Replacing a cartridge is genuinely a 20-minute job. You shut off the water at the under-sink valves, pop off the handle (there’s usually a set screw under a decorative cap or on the side), unscrew the retaining nut or clip, and pull the old cartridge straight up. If it’s stuck with mineral buildup, a cartridge puller tool helps. If you’ve never dealt with the small parts inside a valve, our guide on what a faucet cartridge actually does explains why this one part controls everything, and our walkthrough on removing an old tap washer without wrecking the faucet covers the delicate teardown steps that apply to bar faucets too.
How do I know which replacement bar faucet parts fit my faucet?
The single most important rule: bar faucet parts are brand- and model-specific, not universal — especially the cartridge. Buy parts to match the exact manufacturer and model number, or you’ll end up with a valve that physically won’t seat.
Find your model number stamped on the faucet body, under the spout, on the escutcheon, or in the original paperwork. If you can’t find it, take clear photos of the faucet and the old part and match them against the manufacturer’s parts diagram. Cartridges in particular come in dozens of incompatible shapes — ceramic disc, ball, compression stem — and the length, spline count, and diameter all have to match.
A few parts are more forgiving:
- Aerators come in standard thread sizes — regular male (15/16″-27), regular female (55/64″-27), junior, and Tom Thumb — so you have more flexibility. A quality Neoperl aerator upgrade fits most bar faucets and instantly fixes a splashy or weak stream.
- Supply lines are sized by connection type (3/8″ compression, 1/2″ FIP) and length. If yours are too short or old and stiff, our guide to picking the right faucet supply line length will save you a second trip to the store.
- O-rings are sold in kits, but getting the exact diameter matters for a real seal.
Cartridge types compared: which one is in your bar faucet?
| Cartridge / valve type | How to spot it | Reliability | Typical replacement cost |
|---|---|---|---|
| Ceramic disc | Single lever, smooth quarter-turn feel | Excellent — resists hard water | $15–$45 |
| Cartridge (sleeve/stem) | Single lever, pulls straight up | Very good | $10–$40 |
| Ball valve | Single lever, dome under the handle | Good, more small parts to wear | $15–$35 |
| Compression (rubber washer) | Two handles, tightens firmly to shut off | Older design, drips sooner | $5–$15 |
Most modern bar faucets — including our vevetta bar and prep models — use ceramic disc cartridges because they shrug off the mineral wear that kills older valve types. If you have hard water and your faucet feels gritty when you turn it, a ceramic disc replacement is the upgrade you want.
What bar faucet parts wear out first, and how often?
The aerator clogs first — often within 6 to 18 months in hard-water areas — followed by O-rings and then the cartridge over several years. The faucet body itself, the spout, and the mounting hardware usually outlive everything else.
Here’s a realistic timeline for a bar faucet in a typical household:
- Aerator: mineral crust and grit build up on the screen constantly. Unscrew it, soak it in white vinegar for an hour, and rinse — do this a couple times a year. If it’s cracked or won’t come clean, replace it. This is the number-one cause of “my faucet flow suddenly got weak.”
- O-rings/seals: 3–5 years, sooner if the spout swivels a lot.
- Cartridge: 5–10 years, depending on water quality and use.
- Spray head/hose (pull-down models): the hose can kink or the spray head’s rubber nozzles can clog; the check valve or weight occasionally needs adjusting.
If your aerator or spray head is caked in white scale, don’t just replace it — fix the water it’s fighting. Our guide on removing hard-water crust from a faucet head shows exactly what actually dissolves the buildup without wrecking the finish.
Should I repair my bar faucet or just replace the whole thing?
Repair it if the faucet body and finish are still solid and the problem is a cartridge, aerator, O-ring, or supply line — those parts cost $5–$45 and take under an hour. Replace the whole faucet if the body is cracked, the finish is flaking, the model is discontinued with no parts available, or you’ve already rebuilt it once and it’s failing again.
The math is simple. A cartridge and O-ring kit for a decent bar faucet runs $20–$50. A full new mid-range bar faucet runs $90–$250. So if a $30 part gets you another five years, repair wins easily. The main reason to replace instead is parts availability — a lot of budget import faucets have no replacement parts at all, which is exactly why buying a faucet with a serviceable, documented parts catalog matters up front.
| Situation | Best move | Rough cost |
|---|---|---|
| Drips from spout, body is fine | Replace cartridge | $15–$45 |
| Weak or splashy flow | Clean or replace aerator | $0–$15 |
| Leak at spout base | Replace O-rings | $5–$15 |
| Faucet rocks / loose | Tighten or replace mounting nut | $0–$20 |
| Cracked body or flaking finish | Replace whole faucet | $90–$250 |
| Discontinued, no parts | Replace whole faucet | $90–$250 |
What should I look for in a bar faucet so parts are easy to get later?
Buy a bar faucet from a brand that publishes a parts diagram, sells replacement cartridges and aerators directly, and backs the finish and valve with a real warranty. Serviceability is the difference between a $30 repair and throwing away the whole fixture in year three.
Before you buy, check for these:
- Ceramic disc cartridge — the most durable valve for daily use and hard water.
- Standard aerator thread — so you’re never locked into a proprietary part.
- Solid brass body rather than zinc alloy — brass threads don’t strip and the faucet lasts decades.
- A published parts list and model number — so future you can order the exact cartridge in two clicks.
- A finish backed by warranty — especially on trendy finishes like matte black, brushed gold, or champagne bronze.
Finish matters more than people expect on a bar faucet, because a bar or prep sink is often a visual centerpiece. If you’re leaning toward a warm metallic, our deep dive on choosing a gold bar tap finish breaks down which gold tones hold up and which show water spots — the same finish logic applies to the spout, handle, and escutcheon parts you’ll be looking at every day.
How do I install or reseat bar faucet mounting parts correctly?
Bar faucet mounting parts install from below: the faucet drops through the deck hole, then a washer, mounting bracket, and nut clamp it down against the countertop from underneath. Snug the nut until the faucet can’t rock, but don’t overtighten — you can crack a base plate or strip the threads.
Quick install sequence for a single-hole bar faucet:
- Feed the supply-line tails and any spray hose down through the mounting hole.
- Seat the faucet base (with its gasket or a bead of plumber’s putty if specified) flat on the counter.
- From below, slide on the rubber/metal washer, then the mounting bracket, then thread on the nut.
- Align the spout straight, then tighten the nut with a basin wrench until firm.
- Connect supply lines to the shutoff valves — hand-tight plus a quarter turn with a wrench.
- Turn the water back on slowly, remove the aerator, and run the faucet 15 seconds to flush debris before reinstalling the aerator.
That last step matters: construction grit will clog a brand-new aerator instantly if you don’t flush the line first. If the nut is buried behind supply lines and hard to reach, a basin wrench or a dedicated installation tool makes it far easier.
Author note & why trust vevetta on this
This guide was written by the vevetta product team, drawing on years of designing, bench-testing, and servicing kitchen, bar, and bathroom faucets. We assemble and pressure-test our bar faucet valves before shipping, and we build to recognized plumbing standards (the same ceramic-disc valve durability benchmarks and lead-safe material rules that govern reputable North American and European faucet makers). Every vevetta bar faucet ships with a published parts diagram and a warranty covering the valve and finish, because a faucet you can’t get parts for isn’t a bargain — it’s disposable. We’d rather sell you a $25 cartridge in year six than a whole new faucet.
FAQ
Are bar faucet parts the same as kitchen faucet parts?
They’re the same types of parts — cartridge, aerator, O-rings, spout, handle — but often physically smaller, and the cartridge is still model-specific. A bar faucet is basically a compact kitchen faucet, so the repair logic is identical, but you can’t assume a kitchen faucet cartridge will drop into a bar faucet. Always match the exact model.
What’s the most common bar faucet part to fail?
The aerator clogs first from mineral buildup, usually within a year or two in hard water, causing weak or sputtering flow. It’s also the cheapest and easiest fix — unscrew it, soak it in vinegar, rinse, and reinstall. The cartridge is the next most common failure and is what causes actual drips.
Can I use a universal cartridge in my bar faucet?
Generally no. “Universal” cartridges rarely fit properly because the length, diameter, and spline pattern vary by manufacturer. Buy the cartridge that matches your faucet’s brand and model number. Aerators and supply lines, by contrast, come in standard sizes and are much more interchangeable.
Why is my bar faucet flow so weak even though the water pressure is fine?
Nine times out of ten it’s a clogged aerator. Mineral scale and grit build up on the fine screen and choke the stream. Unscrew the aerator, soak it in white vinegar for an hour, scrub gently, and rinse. If it’s cracked or won’t clean up, replace it with a standard-thread aerator — an inexpensive upgrade that also reduces splashing.
How much does it cost to replace bar faucet parts myself?
Most repairs run $5 to $45 in parts and take under an hour with basic tools. An aerator is $5–$15, an O-ring kit is around $5, and a cartridge is $15–$45. Compared to $90–$250 for a whole new bar faucet, DIY part replacement is almost always worth it as long as the faucet body and finish are still in good shape.
Do I need special tools to replace bar faucet parts?
For most jobs you need an adjustable wrench, an Allen/hex key for the handle set screw, and often a basin wrench for the under-counter mounting nut. A cartridge puller helps if the old cartridge is seized with mineral buildup. Always shut off the under-sink water valves first, and plug the drain so small screws don’t disappear down it.