Learning how to fix a leak from a faucet is one of the highest-value 45 minutes of DIY you’ll ever do: a faucet that drips once per second wastes over 3,000 gallons a year, and the fix almost always comes down to one small worn rubber or ceramic part — not the whole faucet. Below, our team at vevetta walks you through exactly how to diagnose where the leak is coming from, which part to replace, and how to do it without stripping a screw or flooding the cabinet. We’ll cover the four faucet types, the tools you actually need, and the handful of situations where you really should stop and call a pro.
The key thing to understand first: “a leaking faucet” isn’t one problem. Water dripping from the spout is a different fix than water pooling around the base of the handle, which is different again from water dripping under the sink. Figure out where it’s leaking, and you’ve already narrowed it to one repair.
Where Is the Water Actually Coming From? (Diagnose Before You Touch a Tool)
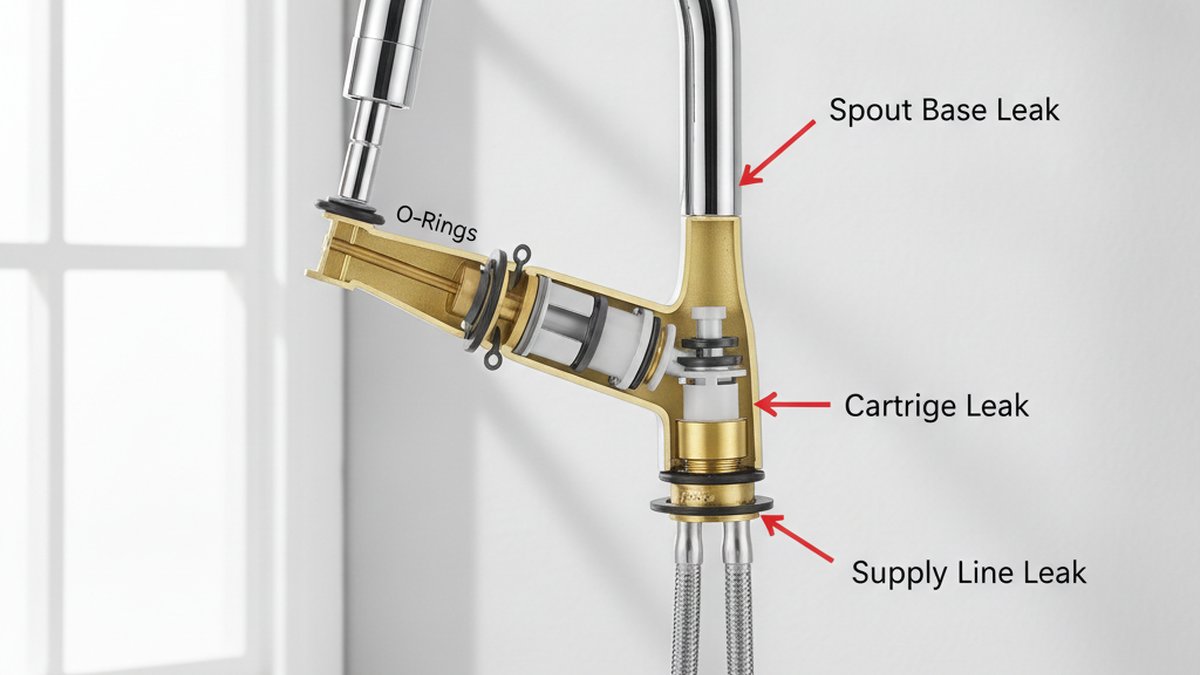
Before you unscrew anything, find the exact leak point — it tells you which part to replace. There are three places a faucet leaks, and each points to a different worn component.
- Drips from the spout tip (even when the handle is fully off) → worn washer, seat, or cartridge. This is the classic “drip… drip… drip” and by far the most common.
- Water seeping from the base of the handle or around the spout collar when the water is running → worn O-rings or a failed spout seal.
- Puddle inside the cabinet under the sink → loose supply-line connection, a bad supply-line washer, or a cracked shutoff valve — not the faucet body at all.
Wipe everything bone dry with a paper towel, run the faucet, then shut it off and watch for 30 seconds. Where the water reappears first is your leak. If it’s under the sink, the faucet mechanism is probably fine — you’re looking at a connection, and that’s often just a quarter-turn tighten with a wrench.
What Kind of Faucet Do I Have, and Why Does It Change the Repair?
The repair depends entirely on your faucet’s internal valve type, so identify it first — there are four, and they fail in different ways. You usually don’t need the brand or model to fix a leak; you need to know which of these four is inside.
| Faucet Type | How to Spot It | Most Common Leak Cause | Part You’ll Replace | Typical Part Cost |
|---|---|---|---|---|
| Compression | Two handles; handle tightens down hard when you shut it off. Usually older homes. | Worn rubber seat washer | Seat washer + O-ring (sometimes the seat) | $2–$8 |
| Cartridge | Single or double handle; handle moves smoothly with no “tightening” feel. | Cracked or scaled cartridge | Cartridge | $10–$45 |
| Ball | Single handle (often kitchen) with a rounded cap under the lever; many small parts. | Worn springs, seats, or cam | Ball-faucet repair kit | $12–$25 |
| Ceramic disc | Single lever, wide cylindrical body; premium modern faucets. | Damaged disc cylinder or inlet seals | Disc cartridge / seal set | $15–$50 |
If you have a two-handle faucet and only one side drips, you only need to rebuild that side — the hot and cold are independent. If it’s a single-lever faucet, the whole drip almost always traces back to one cartridge or one repair kit. This is also why understanding the purpose of a faucet cartridge matters so much: on modern faucets, the cartridge is the valve, and replacing it is the whole repair.
What Tools and Parts Do I Need to Fix a Dripping Faucet?
You need surprisingly little: a screwdriver, an adjustable wrench or pliers, and the correct replacement part for your valve type. Here’s the full kit that handles ~95% of faucet leaks.
- Phillips and flathead screwdrivers — most handle set screws are one or the other. A small hex/Allen key set covers the rest.
- Adjustable wrench (and slip-joint pliers) to loosen the packing nut or retaining nut.
- The replacement part — washer, O-ring set, cartridge, or repair kit. Bring the old part to the store, or better, match it to your faucet brand/model.
- Plumber’s grease (silicone) to lubricate new O-rings and the cartridge so they seat smoothly and last.
- Plumber’s tape (PTFE) for any threaded connections you take apart.
- White vinegar and an old toothbrush to dissolve the hard-water scale you’ll almost certainly find inside.
- A rag or towel to plug the drain (critical — see below) and dry the work area.
One brand-specific note: cartridges and repair kits are not universal. A Moen cartridge won’t fit a Delta, and a Pfister ball kit won’t fit a Kohler disc. Find your faucet’s brand and model number (often stamped under the spout or on the original paperwork) before you buy. If you’re not sure your faucet is even worth rebuilding versus replacing, our guide on what to know when replacing a kitchen faucet helps you make that call.
How Do I Fix a Leak From a Faucet Step by Step?
Here’s the exact sequence that works for the most common repair — a single-handle cartridge faucet dripping from the spout. The same flow (shut off, disassemble, replace, reassemble) applies to all four types; only the middle part differs.
Step 1: Shut off the water and plug the drain
Turn the two shutoff valves under the sink clockwise until they stop. No shutoffs down there? Turn off the home’s main. Then open the faucet to release pressure and confirm the water’s actually off. Now stuff a rag in the drain or close the stopper — this is the step people skip and regret, because tiny set screws and springs love to vanish down an open drain.
Step 2: Remove the handle
Pop off the decorative cap on top of the handle (it hides the screw), back out the screw, and lift the handle straight up. If it’s stuck from mineral buildup, wiggle gently or wrap it in a vinegar-soaked cloth for a few minutes — don’t pry hard against the finish.
Step 3: Pull the worn part
For a cartridge faucet, remove the retaining clip or nut, then pull the cartridge straight up with pliers (note its orientation — it has to go back the same way, or hot and cold swap). For a compression faucet, unscrew the stem and you’ll see the rubber seat washer at the bottom held by a brass screw. For ball and disc faucets, follow the kit’s exploded diagram.
Step 4: Clean, replace, and grease
Scrub away scale with vinegar and the toothbrush — grit is a leading cause of repeat leaks. Install the new washer, O-rings, or cartridge, wiping a thin film of silicone plumber’s grease on every rubber surface. If your old part was learning-curve-worthy, our walkthrough on how to remove an old tap washer without wrecking the faucet covers the tricky seized-washer cases in detail.
Step 5: Reassemble and test slowly
Put it back together in reverse order, hand-tight plus a gentle wrench snug — don’t gorilla it or you’ll crack the new part. Turn the shutoffs back on slowly, then run the faucet and check for drips at the spout and around the base. Let it sit 10 minutes and check again.
Why Is My Faucet Still Leaking After I Replaced the Cartridge?
If it still drips after a cartridge or washer swap, the usual culprit is a damaged valve seat or leftover grit — the new part is sealing against a pitted surface. This is the most common “I did everything right and it still drips” scenario, and it’s fixable.
Run through this checklist:
- Grit under the seal: re-open, flush the valve body with water, and make sure no mineral flakes are trapped under the new part.
- Corroded valve seat (compression faucets): the brass seat the washer presses against gets pitted. Reface it with a seat-dressing tool or replace the seat with a seat wrench.
- Wrong or “close enough” part: a cartridge that’s 2mm off or a washer one size too small will leak. Verify the exact match for your brand/model.
- Over- or under-tightened retaining nut: too loose leaks around the base; too tight can deform the cartridge. Snug, not cranked.
- Cracked faucet body: rare, but if the body itself is cracked from a freeze or old age, no internal part will fix it — the faucet gets replaced.
If the leak is specifically from a shower valve or a tub spout rather than a sink, the mechanism is similar but the access differs — see our dedicated guides on how to fix a leaking shower faucet valve and what’s causing a dripping bathtub faucet.
When Should I Stop and Call a Plumber Instead?
Call a pro when the leak isn’t at the faucet itself — specifically when you find water at the supply valves, inside the wall, or when the shutoff valves won’t turn or won’t seal. These signal a plumbing problem, not a faucet part.
Specifically, hand it off if:
- The under-sink shutoff valves are seized, weeping, or won’t fully close — replacing a shutoff involves the supply line and sometimes soldering.
- You see water staining a wall or ceiling near the plumbing — that’s a pressurized pipe or an in-wall valve, not a faucet.
- The faucet body is cracked, or threads are stripped so nothing tightens.
- You’ve replaced the cartridge twice and it still drips — there may be a water-pressure or thermal-expansion issue upstream.
None of these are failures on your part — they’re just outside the “swap one $10 part” zone where DIY makes sense. A basic faucet cartridge replacement runs you the cost of a part; the same job billed by a plumber often runs $150–$300 in labor, which is exactly why the spout drip is worth doing yourself.
How Do I Keep My Faucet From Leaking Again?
Most repeat faucet leaks come down to hard-water scale chewing up rubber and ceramic seals, so managing mineral buildup is the single best prevention. A faucet in soft water can go a decade without a drip; the same faucet on hard water might need a cartridge every 2–3 years.
To stretch the time between repairs:
- Don’t over-tighten the handle when you shut off the water — that’s what grinds washers flat. Firm is enough.
- Descale the aerator and internals a couple of times a year with vinegar. Buildup at the tip stresses the whole valve.
- Grease new seals with silicone plumber’s grease at every rebuild so they slide instead of tearing.
- Fix the fast — address a drip early; a small drip becomes a scored valve seat if you let it run for months.
- Consider a quality replacement faucet with a ceramic-disc cartridge if you’re on hard water — they tolerate grit far better than rubber-washer designs.
A drip you catch this weekend is a $10 washer; the same drip ignored for a year is a corroded seat, a stained sink, and thousands of gallons on your water bill.
FAQ
How much does it cost to fix a leaking faucet myself?
Between $2 and $50 in parts, depending on your faucet type — a rubber washer for a compression faucet is a couple of dollars, while a branded ceramic-disc cartridge can run up to $50. The tools (screwdriver, wrench, plumber’s grease) are one-time buys under $30 total, and you’ll reuse them for years.
Why does my faucet drip even when it’s turned completely off?
Because the internal seal — the washer, O-ring, or cartridge — no longer forms a watertight barrier against the valve seat, so pressurized water sneaks past it and out the spout. This is the textbook sign of a worn washer or cartridge, and it’s the most fixable faucet leak there is. Replace that one part and the drip stops.
Can I fix a leaking faucet without turning off the water?
No — never disassemble a faucet with the water on. The line is under pressure, and pulling the cartridge or stem will send water spraying into the cabinet and room. Always close the under-sink shutoffs (or the main) and open the faucet to bleed off pressure first. It takes 30 seconds and prevents a genuine mess.
How do I know if I need a new washer or a whole new cartridge?
Check your faucet type: two-handle faucets that tighten firmly when shut off use rubber washers, while smooth single-lever faucets use cartridges. If your faucet has a washer and the drip is at the spout, start with the washer and seat; if it’s a cartridge faucet, replace the cartridge. When unsure, pull the part out and inspect it — cracks, grooves, flattening, or heavy scale mean it’s done.
Is it cheaper to repair or replace a leaking faucet?
Repair, almost always — a single worn part is far cheaper than a new faucet plus installation. The exception is a faucet that’s more than 15 years old, corroded, or a discontinued model you can’t find parts for; at that point, replacing it gets you a modern ceramic-disc valve that leaks far less. If yours is aging or you’ve rebuilt it repeatedly, replacement is the smarter long-term call.
How long should a faucet repair last before it leaks again?
A properly done cartridge or washer replacement should last 3–7 years, and often longer on soft water. If a fresh repair fails within weeks, the problem is usually leftover grit under the seal, a corroded valve seat, or a slightly mismatched part — not the new component itself.
About the author: This guide was written by the vevetta fixtures team, who install, test, and tear down faucets across kitchen, bath, and utility applications year-round. vevetta designs and sells faucets and bathroom fixtures at vevetta.net, and every faucet we build is pressure- and cycle-tested to meet standard low-lead and durability specifications (think ASME/NSF-style plumbing standards) and is backed by a manufacturer warranty. We recommend the exact repair steps we’d use on our own products — and we’ll tell you honestly when a leak means it’s time to replace rather than repair.