A clean, drip-free shower system installation is one of the highest-impact upgrades you can make to a bathroom, and it’s far more achievable than most homeowners assume. Whether you’re replacing a tired single-spray head or building out a full rainfall-plus-handheld setup, the difference between a frustrating weekend and a flawless result is understanding the components before the first wrench turns. This guide breaks down every decision — system type, valve compatibility, finish, and the install sequence itself — so you buy the right shower system the first time.
At Vevetta, we design and pressure-test our shower systems against real household water conditions, and we’ve fielded thousands of installation questions from customers. Below is the distilled version: what matters, what doesn’t, and how to avoid the mistakes that lead to call-backs and water damage.
Why Shower System Installation Starts With the Right System, Not the Right Tools
Most failed projects don’t fail at the wrench — they fail at the cart. The single biggest predictor of a smooth shower system installation is choosing a system that actually fits your existing rough-in plumbing and water pressure. Buy a 16-inch rainfall head for a home with 40 PSI and you’ll get a gentle drizzle no matter how perfectly you mount it.
So before anything else, answer three questions: How many outlets do you want (head only, head + handheld, head + handheld + body sprays)? What is your home’s static water pressure? And is your existing valve a pressure-balancing or thermostatic type? Those three answers narrow your options dramatically and prevent the most common return reason we see.
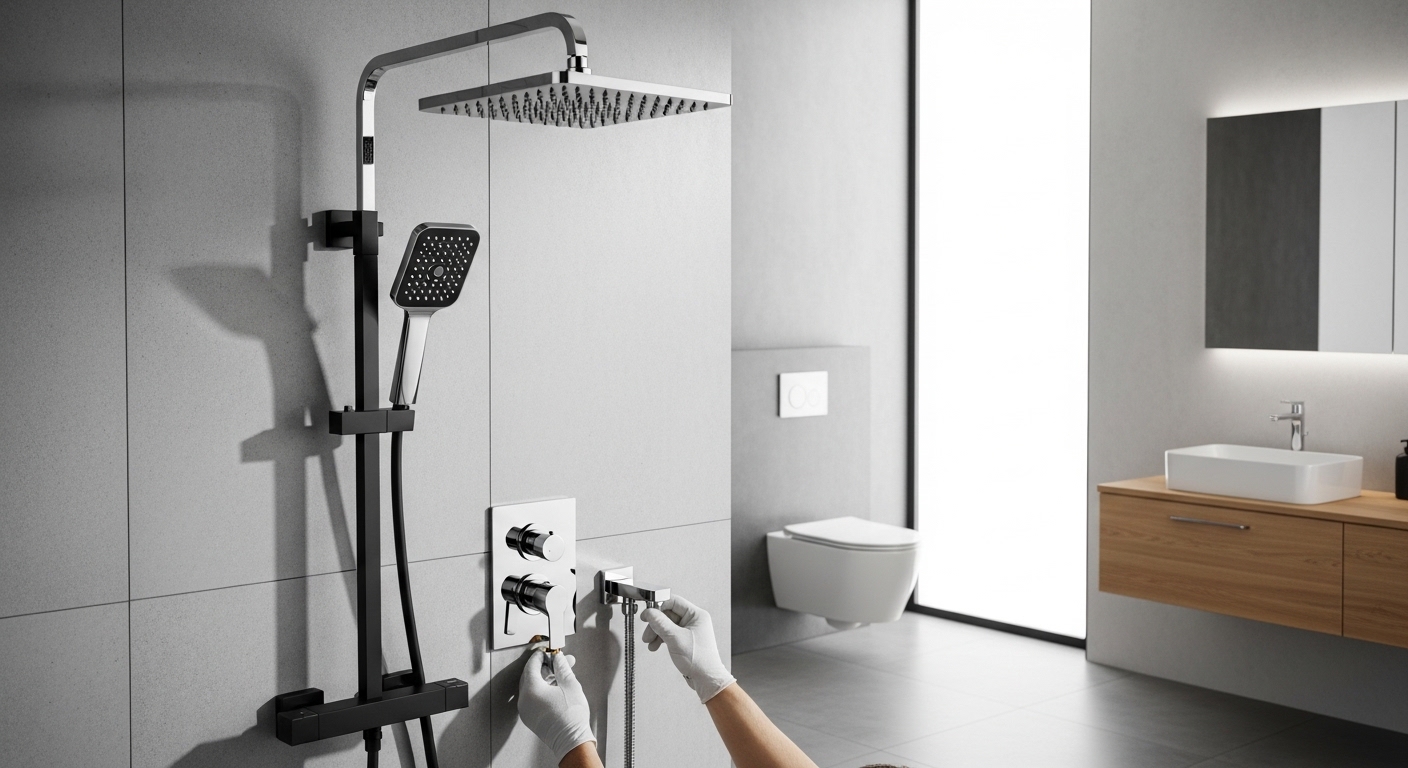
What Actually Counts as a “Shower System”?
The term gets used loosely. A true shower system is a coordinated set of components designed to work together off a single control: the showerhead, the valve trim, the rough-in valve body behind the wall, and usually a hand shower, slide bar, or diverter. A standalone showerhead you screw onto an existing arm is a fixture swap, not a system installation — and it requires almost none of the steps below.
If you’re after a quick handheld upgrade rather than a full build-out, our deep-dive on handheld shower heads in Venetian bronze covers spray patterns, hose lengths, and finish matching without touching the wall.
Types of Shower Systems Compared
Shower systems fall into a few clear categories. Each has a different installation footprint, price band, and ideal use case. Use the table below to find your lane before you shop specific models.
| System Type | What It Includes | Install Difficulty | Best For | Typical Price Range |
|---|---|---|---|---|
| Exposed (Surface-Mounted) | Visible riser pipe, head, handheld, exposed valve | Easy — no wall opening required | Renters, retrofits, fast upgrades | $120–$350 |
| Concealed (In-Wall) | Hidden valve body, flush trim plate, rainfall head | Hard — requires opening the wall | Renovations, luxury builds | $300–$900 |
| Dual-Function (Head + Handheld) | Fixed head, handheld on slide bar, diverter | Moderate | Families, accessibility | $180–$500 |
| Thermostatic Multi-Outlet | Rainfall, handheld, body jets, thermostatic valve | Hard — multiple outlets, precise plumbing | Spa-style master baths | $500–$1,500+ |
If you’re upgrading without opening drywall, an exposed system is almost always the right answer — it mounts to your existing shower arm outlet and supply, and a confident DIYer can finish in an afternoon. Concealed and multi-outlet thermostatic systems deliver the cleanest look and best temperature control but belong to a planned renovation where the wall is already open.
Rough-In Valves: The Heart of Any Shower System Installation
The valve behind your wall determines what trim and system you can use. Get this wrong and nothing else fits. There are two valve technologies you’ll encounter, and knowing yours is non-negotiable before purchase.
Pressure-Balancing vs. Thermostatic Valves
- Pressure-balancing valves keep temperature steady by reacting to pressure swings — when someone flushes a toilet, the valve compensates so you don’t get scalded. They use a single handle and are the most common residential standard. Affordable and reliable.
- Thermostatic valves hold a set temperature precisely regardless of pressure or incoming temperature changes, and they let you run multiple outlets at once (rainfall + body jets). They cost more and are essential for any multi-function spa system.
Critically, valve trim is brand- and series-specific. A Vevetta trim kit is engineered to mate with a Vevetta rough-in valve; mixing brands is the fastest route to a leak or a non-functioning diverter. If you’re replacing only the visible trim on an existing valve, confirm the underlying valve body’s brand and series first.
Choosing a Finish That Survives Daily Use
Finish is more than looks — it dictates how the system ages against water spots, soap, and cleaning products. Brushed nickel and matte black hide water spots best; polished chrome is the most durable and budget-friendly; brushed gold and bronze deliver warmth but reward gentle care.
Whatever finish you choose, the surface treatment determines longevity. If you’re leaning toward a brighter, reflective metal, our guide to polished nickel faucet and fixture maintenance explains the cleaning routine that keeps plated finishes from clouding — the same principles apply directly to shower trim and handheld wands.
Tools and Materials Checklist
Gather everything before you start. Stopping mid-install to run to the hardware store is how a clean job turns into an overnight project with the water shut off.
- Adjustable wrench and a set of channel-lock pliers
- PTFE (plumber’s) thread-seal tape — white for water lines
- Phillips and flathead screwdrivers
- Allen/hex key set (most trim set screws use these)
- Silicone caulk and a caulk gun (for exposed systems)
- Clean rag and a bucket to catch residual line water
- Level and a tape measure
- Your system’s installation manual and template, if included
For concealed installations, add a stud finder, a drywall or tile saw, and a soldering kit or push-fit fittings depending on your supply lines. If soldering copper isn’t in your skill set, this is the point to bring in a licensed plumber.
Step-by-Step Shower System Installation
The following sequence covers an exposed dual-function system — the most common DIY shower system installation. Concealed systems follow the same logic but insert wall-opening and valve-mounting steps near the beginning.
- Shut off the water. Use the bathroom shutoff if you have one, otherwise the main. Open the existing valve to drain residual pressure.
- Remove the old fixture. Unscrew the old showerhead and arm. Clean old thread tape and debris off the wall outlet threads.
- Wrap the threads. Apply three to four clockwise wraps of PTFE tape to every threaded male connection. This is the single most important leak-prevention step.
- Mount the riser or valve trim. For exposed systems, thread the riser elbow into the wall outlet hand-tight, then a quarter turn with a wrench. Don’t overtighten — you’ll crack the fitting before you improve the seal.
- Attach the head and handheld. Connect the rainfall head to the top outlet and the hand shower hose to the diverter outlet. Hand-tighten, then snug gently.
- Level and secure. Use your level on the riser bar, then fasten the wall bracket with the provided anchors. Drill into a stud where possible; use proper tile anchors otherwise.
- Restore water and test. Turn the supply back on slowly. Run hot and cold through every outlet and the diverter.
- Check for leaks. Wipe every joint dry and watch for beading water for a full two minutes. Re-tape and re-seat any weeping connection.
- Seal exposed mounts. Apply a thin bead of silicone around wall brackets to stop water tracking behind the fixture.
That’s it. A patient first-timer should budget two to three hours for an exposed system. If a joint drips no matter how you tighten it, the culprit is almost always insufficient or counter-wrapped thread tape — the same root cause behind most household faucet drips.
Common Shower System Installation Mistakes
Even a careful shower system installation can go sideways for predictable reasons. Here are the ones our support team sees most:
- Overtightening connections. Metal-on-metal force cracks fittings and crushes washers. Snug, not gorilla-tight.
- Skipping or reverse-wrapping thread tape. Tape must wrap in the direction the fitting turns or it unravels and leaks.
- Mismatched valve and trim brands. Diverters and cartridges are not universal.
- Ignoring water pressure. Large rainfall heads need 45+ PSI to perform as designed.
- Not flushing the line. Debris from old pipes clogs new aerators and cartridges within days.
If a slow drip appears days or weeks later, don’t assume the whole system is faulty — most post-install leaks are a single under-sealed joint. Our walkthrough on fixing a leaky faucet in about ten minutes uses the same diagnostic logic that applies to shower connections and will save you a service call.
Choosing a Vevetta Shower System
When you’re ready to buy, match the system to the homework you did above: outlet count, valve type, pressure, and finish. Vevetta systems ship as complete, matched kits — head, handheld, valve trim, and hardware engineered to fit together — which removes the cross-brand compatibility gamble that derails so many installs.
Every Vevetta shower system is pressure-tested before it leaves the warehouse, meets ASME A112.18.1 / CSA B125.1 fixture standards, and is backed by a limited lifetime warranty on the valve cartridge and finish. That testing-and-standards backing is the practical reason a matched kit beats assembling parts piece by piece — the tolerances are verified as a set, not hoped for.
FAQ
How long does a shower system installation take?
An exposed surface-mounted system typically takes a confident DIYer two to three hours. A concealed in-wall or multi-outlet thermostatic system is a half-day to full-day job and usually warrants a licensed plumber because it involves opening the wall and connecting supply lines.
Do I need a plumber to install a shower system?
Not for exposed systems that thread onto your existing shower arm outlet — those are designed for DIY. You should hire a plumber for concealed systems, any job requiring soldering or moving supply lines, and multi-outlet thermostatic builds where precise valve plumbing matters.
Will a new shower system fit my existing valve?
Only if the trim and valve are the same brand and series. Trim kits are not universal. If you’re keeping your in-wall valve and replacing only the visible parts, identify the valve’s brand and model first. If you’re replacing everything behind the wall, a complete matched kit avoids the issue entirely.
What water pressure do I need for a rainfall shower head?
Large rainfall heads perform best at 45 PSI or higher. Below about 40 PSI, an oversized head feels weak. If your pressure is low, choose a smaller head, a pressure-optimized model, or add a shower pump rather than fighting physics.
How do I prevent leaks after installing my shower system?
Wrap three to four clockwise turns of PTFE tape on every threaded connection, hand-tighten then add only a quarter to half turn with a wrench, and run a two-minute dry-joint leak test before closing up. Seal exposed wall brackets with a thin silicone bead to stop water tracking behind the fixture.
Can I replace just the showerhead instead of the whole system?
Yes. If your valve and trim are working and you only want a different spray, a simple head or handheld swap takes minutes and requires no wall work. A full system installation only makes sense when you’re changing the valve, adding outlets, or refreshing the entire look.
Author’s note: This guide was written by the Vevetta product and installation team, drawing on hands-on testing of our shower systems and years of fielding real customer installation questions. We update it as standards and product lines change. Always follow your specific model’s included instructions and local plumbing codes; when in doubt, consult a licensed plumber.